Learn the most reliable method for how to tell when a pork chop is done. No more second guessing. No more dry or undercooked pork chops.
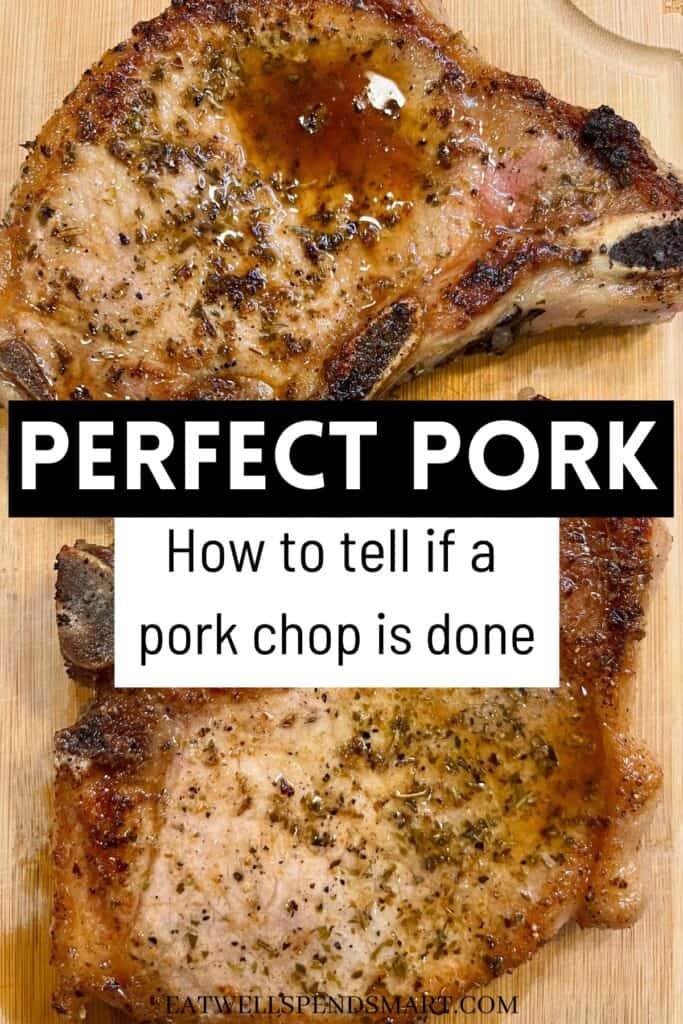
Perfect Pork Chops Every Single Time
Mastering the temperature to which pork chops should be cooked can feel scary. Cooking meat in general is intimidating to many people. You may have tried many times to cook pork chops but no matter what you either get a dried out chop or an underdone chop. So how can you tell when a pork chop is done? Among all of the ways to tell if a pork chop is done, the instant-read thermometer stands out as the best way hands down. Its trustworthiness overshadows the less reliable, though still popular, techniques such as poking, prodding, slicing, or relying on color of the meat. If you are searching for juicy, tender pork chops, get yourself an instant read meat thermometer!
Safe Internal Temperature
Cooking pork chops to the precise internal temperature not only safeguards your health against food poisoning but also guarantees the juiciness and tenderness of the meat.

Insert the thermometer into the thickest part of the chop and watch for the reading to stabilize between a safe temperature of 145°F and 155°F; this range indicates perfectly cooked juicy pork chops. Steer clear of cooking pork beyond these temperatures, as it can result in dryness. There's nothing worse than a dried out chop! Trust your meat thermometer—it's the secret to achieving the perfect pork chop every time.
Then allow the meat to "rest". All this means is to remove the meat from the heat source to a plate or cutting board and letting it set before cutting it.
Choosing Your Pork Chops Wisely
It's also important to note that different cuts of meat greatly impact the cooking method and final outcome. Familiarize yourself with the various types of cuts.
- Rib chops come from the rib portion and bear a desirable blend of fat and lean meat, yielding tender results when cooked properly.
- Loin chops, trimmed from the loin, are leaner and demand careful attention to prevent overcooking.
- Sirloin chops, from the hip area, contain more muscle and bone, offering good flavor but requiring slower cooking to tenderize.
- The blade chop carries marbling and connective tissue, which are good if braised or slow-cooked.
- Boneless chops are convenient, but they can often lack the moisture imparted by the bone during cooking, resulting in a less juicy finish.
Make your choice based on the intended cooking style, and these cuts can guide you to step confidently toward pork perfection.
Preparation Before the Heat
Before your pork chops even hit the heat, a few key preparations will make you even more successful.

- First, let those chops come to room temperature before they cook. Taking them out of the refrigerator for a brief period allows for more even cooking; no more raw centers or overdone edges. Just give them around 15 to 30 minutes of tempering time, and they'll be primed and ready for the heat, promising a result that's cooked evenly through every bite.
- Second, season those raw pork chops generously. Pat the pork chops dry and then sprinkle the right amount of salt and your choice of spices (pepper, garlic powder, paprika, Italian seasoning, etc) will not only add flavor but also help to retain moisture. Don't hold back here—every bit of seasoning makes a difference.
- You could also season the meat by marinating it. If you remember ahead of time, try this pork chop marinade. If you don't remember ahead of time, seasoning with plenty of salt and other seasonings will be just fine.
Mastering the Touch Test
What if you don't have an instant read meat thermometer? My short answer is to get one, but if you are in a pinch and can't get one, you can try the "touch test". Here's how you can master this tactile technique:
- Start with Your Hand: Open your palm and relax it. This step will serve as your basic comparison for the different levels of doneness.
- Compare to Your Fingers: Gently press the base of your thumb and compare that bouncy feeling to your pork chop. They should feel somewhat similar in firmness.
- From Rare to Well-Done: Each finger represents a level of doneness: touch your thumb to your first finger (index) for rare, middle finger for medium rare, ring finger for medium well, and pinky for well done. As you make each touch, check the firmness at the base of your thumb—it gets firmer as you go along. I would go for somewhere between the middle and ring finger.
- Match It Up: Press the pork chop with a utensil and compare the resilience to the firmness in your hand from the previous step. This will give you a quick and easy indication of whether your meat has reached the desired cooking stage.
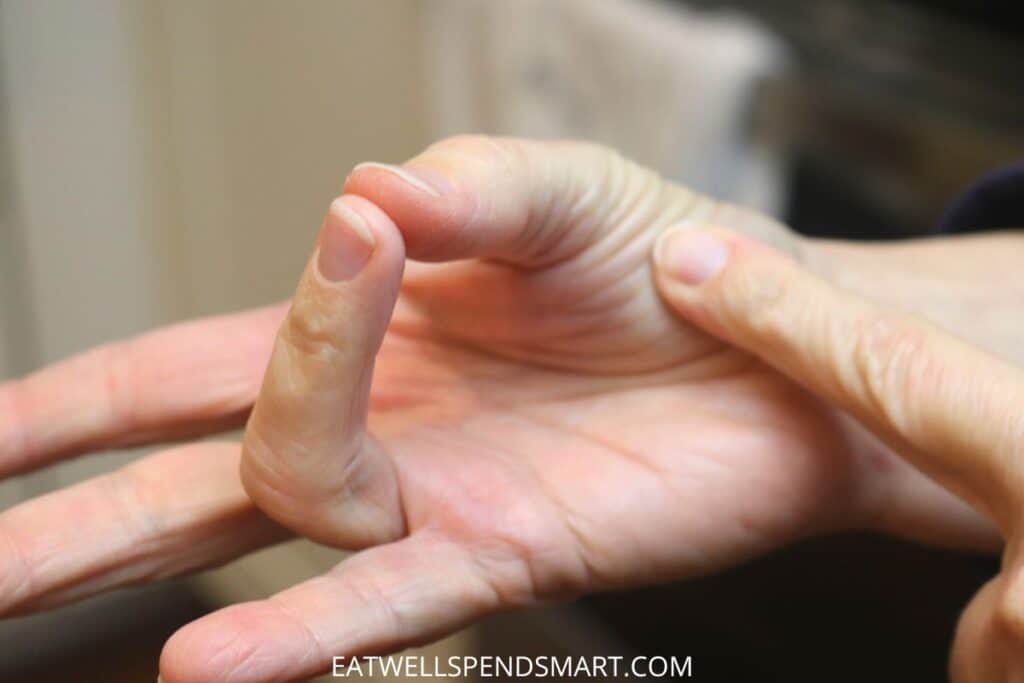
While the touch test provides a good rule of thumb, remember it's a supplementary method. For precise results, always consider using a meat thermometer, especially since factors like chop thickness and heat distribution can affect the feel of your pork chop.
Visual and Tactile Cues
Visual and tactile indicators can often guide you in assessing the doneness of pork chops. Look for a golden-brown sear on the surface, which suggests a good crust has formed, synonymous with well-cooked meat. As you press gently on the meat, it should be firm but with a slight spring back - a sign that it's not overcooked. Clear juices running from the pork chops when lightly pressed or cut into is another signal that they're ready.
Be mindful, though, these are not foolproof. Differences in lighting can distort the meat's color, and a sear might develop well before the inside reaches the proper temperature. Texture can vary with the cut of the meat or even how long it's been marinated. Also, with a thick chop, the surface could mislead you, appearing cooked while the middle of the chop remains undercooked. While these signs serve as helpful hints, always back them up with a reliable meat thermometer to confirm that your pork chops have truly reached the optimal doneness. Trusting the internal temperature eliminates guesswork and ensures that your pork is both safe and succulent.
Getting a Great Sear

For that irresistible golden brown crust and succulent interior, searing your pork chops is key. Begin by patting the meat dry with a kitchen towel or paper towel as excess moisture hinders browning. Heat your pan or grill to medium heat - a droplet of water should sizzle and evaporate on contact. Use an oil to coat the surface lightly.
Once hot, place your pork chops down and let them sear undisturbed for a few minutes. How long? Look for the edges to turn golden and the meat to release from the cooking surface naturally. This signals a proper sear and it's time to flip. Repeat on the other side, cooking until you achieve a uniform, golden-brown sear that would make any chef proud.
Remember, thick cuts can benefit from finishing in the oven after searing. This ensures the inside reaches the desired doneness without burning the outside. A pro tip: Rest your pork chops after searing, allowing the juices to redistribute for maximum tenderness and flavor.
Common Mistakes to Avoid
Here are some frequent errors and their practical fixes.
- Skipping the Meat Thermometer: We've already gone over this, but it can't be stated enough. Judging doneness based solely on cooking time or feel can lead to undercooked or overcooked pork. Rectify with a simple instrument: the meat thermometer. Insert it into the thickest part of the meat to get an accurate reading, avoiding bone or fat. Aim for and ideal temperature of 145°F to 155°F. The closer to 145 the better. Do not panic if your meat is slightly pink. It is still safe to eat according to the USDA's food safety rules. Pink pork chops are fine as long as the temp has reached the safe zone.
- Opting for Ultra-Thin Chops: Thin chops can overcook in a blink. I prefer a thicker chop instead. Choose cuts at least one inch thick for even cooking and juiciness.
- Ignoring the Prep: Cooking cold meat straight from the refrigerator can result in uneven cooking. Give them time to reach room temperature. Season abundantly beforehand, and for an extra juicy bite, consider a brine.
- Avoiding Fat Trimming: Excess fat leads to flare-ups and a greasy finished product. Trim the excess, leaving a small layer for flavor.
- Overlooking the Rest: As tempting as it is to slice right off the grill, allowing the meat rest before cutting into it will help the juices to redistribute, ensuring each bite is moist. A 3-5 minute wait is a small price for perfection.
- Overcooking Fears: The dread of undercooking may push you to cook them too long leading to dry meat. Trust your thermometer, not your fears. Remember, a little pink in the middle is fine for pork products.
- Not Adjusting for Bone: Bone-in pork chops take a bit longer to cook than boneless pork chops. Account for this subtle difference to achieve optimal doneness.
By following these tips, you avoid common mishaps when cooking pork chops. Embrace the thermometer as your guide and treat your chops with the respect they deserve before, during, and after cooking. Your reward will be perfectly cooked pork every time.
Pork Chop Recipes
Here are two pork chop recipes that I think you will love.
pork chops with apples and bacon
pork chops with onions and mushrooms
Leave a Reply